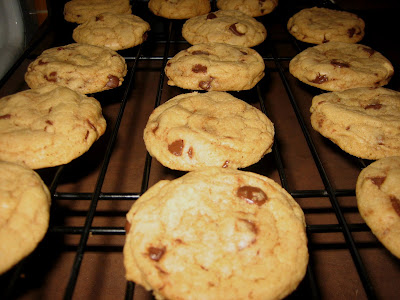
One Pot Chocolate Chip Cookies
Updated June 22, 2014
I finally got to bake cookies in my new kitchen! I was dying to try out the new oven…you never know how different ovens will treat you. Luckily, this one seems to like me so far.
Chocolate chip cookies have been the talk of the town lately, everyone seems to have their own opinion on the best recipe. My friend, Kym, said she has found her favorite so I decided to try it. I am always up for a new recipe…especially a cookie one!
This recipe comes from The Weekend Baker. It is a “One Pot” recipe…so it was super simple! You melt the butter in a pot and then whisk in the sugars, and add the dry ingredients. No mixer needed! These cookies were so easy to throw together.
Now onto the important part, how did they taste? They were fabulous! They were crisp around the edges and very soft in the center. They did not flatten out either. The texture was very nice, buttery and chocolaty with a hint of vanilla in every bite! They even stayed soft the next day…we ate them all in two days so I can’t tell you about day 3:)
Overall this cookie is a winner! I will be making them again!
Whisking in the sugars! Love the one pot idea!
Be careful to not overbake these babies! You want them to be soft!
They are tasty right out of the oven, just don’t burn your mouth:)
One Pot Chocolate Chip Cookies
Adapted from Abigail Johnson Dodge in The Weekend Baker
Makes 26 cookies
8 tablespoons (4 ounces/113 grams) unsalted butter, cut in 4 pieces
½ cup (4 ounces/113 grams) firmly packed light brown sugar
⅓ cup (2 ½ ounces/71 grams) granulated sugar
1 ½ cups (6 ¾ ounces/191 grams) all-purpose flour
½ teaspoon baking powder
¼ teaspoon salt
1 large egg
1 teaspoon pure vanilla extract
1 cup (6 ounces/170 grams) semisweet chocolate chips
1 – Position an oven rack on the middle rung. Heat the oven to 350 degrees (180 C). Line 2 cookie sheets with parchment or nonstick baking liners (I like the Silpat).
2 – Put the butter in a medium saucepan and set over medium heat, stirring occasionally, until the butter is melted. Slide the pan from the heat and add the brown sugar and granulated sugar. Whisk until no lumps remain. Set aside to let cool, about 5 minutes.
3 – In a medium bowl, combine the flour, baking powder, and salt. Whisk until well blended. Once the butter mixture has cooled, add the egg and vanilla and whisk until blended. Pour in the flour mixture and stir with a rubber spatula until blended. Stir in the chocolate chips and the nuts, if using.
4 – Using a small ice-cream scoop (about 1 2/3 inches/4.25 cm in diameter) or 2 tablespoons, drop scant 2-tablespoon mounds of the dough onto the prepared cookie sheets, arranging them about 1 ½ inches (4cm) apart. (At this point, the loaded cookie sheets can be slipped into the freezer until the cookies are frozen, about 1 hour. Then transfer the cookies to heavy-duty freezer bags and freeze for up to 3 months. To bake, remove from the freezer, arrange on lined cookie sheets, and leave on the counter to thaw slightly while the oven heats.)
5 – Bake 1 sheet at a time (make sure to use a cooled sheet for the second batch until the cookies are light golden around the edges and puffed, about 12 minutes. If these cookies are over baked, the won’t come out chewy. Transfer the cookie sheet to a rack to cool for about 10 minutes. Using a spatula, lift the cookies from the sheet onto a rack and let cool completely.
Storage: Layer the baked and cooled cookies between parchment or waxed paper in an airtight container. They can be stored at room temperature for up to 5 days or in the freezer for up to 3 months. You don’t even need to thaw them completely. They’re just as delicious cold.
BIG Cookie Variation: Scoop ¼ – cup portions and arrange 3 inches (7.75 cm) apart on prepared cookie sheets. Flatten the mounds slightly with lightly floured fingertips. Bake 1 sheet at a time until the cookies are light golden around the edges and puffed, about 13 minutes. Remove from the oven and let cool as directed for the regular sized cookies. Makes 10 cookies.


This one is a definate keepr. Thanks. They look really good.
Great idea to make them in a pot, lol! They look great and what a perfect thing to do in a new oven!
you can never go wrong with chocolate chip cookie’s!
These look so good. I am all for a recipe that keeps the dirty dishes to a minimum. Yum!
Mmm those cookies look delicious! And one pot, sounds great. I always end up using a billion dishes when I bake (or cook).
I can just tell by looking at them that they are super good! YUM! Thanks for the great recipe!
You can’t beat chocolate chip cookies. One pot is always a bonus too! Thanks for visiting my blog
I LOVE the one-pot idea. These look very good.
Did heating the sugar give them a shiny-look? That’s what I’ve noticed…I’ve been playing around a little bit with that.
They look great! And only using one bowl is a genius idea! I will definitely be trying these soon. Thanks!
wow, one pot? sounds fantastic! and I like how it doesn’t seem like it makes too much so you don’t have them hanging around the house. May have to try these out!
how lovely! i’ve never made cookies like this (always creaming room temp butter w/ sugar) – recipes w/ melted butter are always so much easier. i’ll definitely try this out. congrats on the new oven!
I love your one pot idea.. it sure beats taking out the kitchen aid! I’m going to have to try this method out next time!
I love a good chocolate chip cookie and the idea of making them in a pot is really intriguing! They look like they turned out perfectly too. I will have to give these a try. I am glad to hear you are getting along with your oven 🙂
Yeah! So glad you found my blog so I could find yours. I’m totally going to try those World Peace cookies tonight!
Those ccc’s look really good. The craving is growing…must bake cookies…
I’m glad your oven likes you. 🙂 Now I know we’ll see all sorts of yummy things coming from it.
Great looking cookies!
Love the one pot idea…and they look soooo good!
These look wonderfully delish. I have the weekend baker, great book!
Maria
x
so easy! a great help when you are strapped for time. love it.
star star star!
I know this post is old, but I just stumbled across it… I wanted to say I made these and they are fabulous! This is an easy recipe, with minimal cleanup and yummy results, perfect!!
There is a mistake on the ingredients, the original recipe calls for 1/2 teaspoon of baking powder and this recipe indicates 1 teaspoon. I borrowed the weekend baker book from the library and the first batch turned out perfect, but the subsequent batches were never as good as I was following this page. So glad to realized that after all it wasn’t me.
Thanks for catching that! I updated the recipe!